Whether you're hard of hearing, watching a foreign lecture, or just want subtitles during a Zoom call — your Mac can generate real-time subtitles for any audio playing on it, without sending a single byte to the cloud.
In this guide, we'll walk through three ways to get live subtitles on macOS, from the most capable option to the simplest. By the end, you'll know exactly which method fits your workflow.
What Are Real-Time Subtitles?
Real-time subtitles are live text transcriptions of any audio playing on your Mac — system audio, microphone input, or both. Unlike pre-recorded subtitles baked into a video file, these are generated on-the-fly by AI as the audio plays.
The key breakthrough in recent years is on-device AI. Models like OpenAI's Whisper and Apple's SpeechAnalyzer run entirely on your Mac's hardware. That means your audio never leaves your machine — no internet connection required, no cloud servers processing your conversations, no privacy trade-offs.
On-device transcription also means lower latency. There's no round-trip to a server, so subtitles appear almost instantly as words are spoken.
Method 1: NotchLive (Recommended)
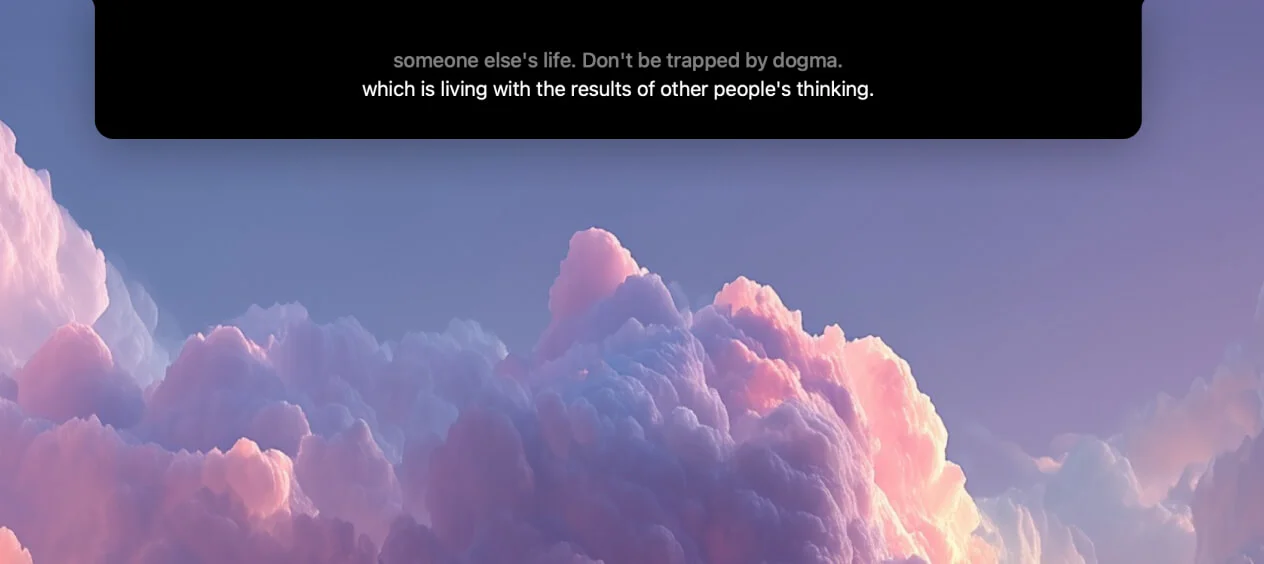
NotchLive is a macOS menu-bar app that turns your MacBook's notch into a live subtitle display. It uses Whisper AI on-device to transcribe and translate any audio in real-time. Here's how to set it up:
Step 1: Download NotchLive
Grab the latest version from notchlive.app or download the DMG directly from GitHub Releases. Drag it into your Applications folder and launch it. NotchLive lives in your menu bar — no dock icon, no clutter.
Step 2: Grant Screen Recording permission
NotchLive needs Screen Recording permission to capture system audio (what's playing through your speakers). macOS will prompt you the first time. Go to System Settings > Privacy & Security > Screen Recording and make sure NotchLive is enabled.
Step 3: Grant Microphone permission (optional)
If you want to caption your own voice — useful during calls or meetings — grant Microphone access as well. This lets NotchLive transcribe both sides of a conversation simultaneously using dual audio streams.
Step 4: Download a Whisper model
Open NotchLive's settings and download a Whisper model. Small is the default — it's fast and accurate enough for most use cases. If you want higher accuracy for accented speech or noisy environments, try Medium or Large Turbo. You can hot-swap models while captioning is running.
Step 5: Start captioning
Press ⌥⌘C (Option + Command + C) or click the menu bar icon and hit Start. That's it — subtitles will appear in your MacBook's notch area in real-time as audio plays.
Bonus features: Switch to Translate mode with ⌥⌘T to get real-time translation into 20 languages. Open Caption Display with ⌥⌘F for a large subtitle window that stays visible during screen sharing. Record sessions to save full transcripts with timestamps for later review.
NotchLive supports 90+ languages for transcription via Whisper, works on both Apple Silicon and Intel Macs running macOS 14+, and keeps everything 100% on-device.
Method 2: Apple Live Captions
Apple ships a built-in caption system on every Mac with Apple Silicon running macOS 13 or later. It's free and requires zero setup.
How to enable it:
Open System Settings
Go to Accessibility > Live Captions
Toggle it on
A floating caption window appears on your screen and transcribes any audio playing on your Mac. You can drag the window around and resize it.
Apple Live Captions works well for basic English transcription. However, there are some notable limitations:
Apple Silicon only — Intel Macs are not supported
Limited language support — primarily English-focused, with a slowly expanding list
No translation — it transcribes but won't translate to another language
No transcript saving — once the audio stops, the captions are gone forever
Blanks out during screen recording — if you're recording your screen or sharing it on Zoom, the caption window disappears with no warning
For occasional English captioning without any extra apps, Apple Live Captions is a solid choice. For anything beyond that, you'll hit its limits quickly.
Method 3: Zoom, Meet, and Teams Built-In Captions
If you only need subtitles during video calls, most conferencing apps now have their own captioning features built in.
Zoom
Click "Live Transcript" in the bottom toolbar, then select "Enable Auto-Transcription". Subtitles appear at the bottom of the Zoom window for all participants. The host may need to enable this feature in their Zoom account settings first.
Google Meet
Click the "Turn on captions" button (the CC icon) in the bottom toolbar. Captions appear in real-time at the bottom of the call window. Available in English and a growing number of other languages.
Microsoft Teams
Click "More" (the three-dot menu) in the meeting toolbar, then select "Turn on live captions". Teams also offers a live transcript panel that you can open alongside the meeting.
The catch with built-in captions
These captions are cloud-processed — your audio is sent to the provider's servers for transcription. They also only work within their own app. Zoom captions don't help you when you're watching a YouTube video, listening to a podcast, or in a FaceTime call. And you have no control over accuracy, model quality, or language support.
Which Method Should You Use?
Quick decision guide
Want subtitles for everything — calls, YouTube, podcasts, music, any audio on your Mac? Use NotchLive.
Just need quick English captions occasionally and don't want to install anything? Use Apple Live Captions.
Only need captions during video calls and don't mind cloud processing? Use Zoom, Meet, or Teams built-in captions.
For most people, the ideal setup is NotchLive as your primary subtitle tool — it works with any audio source, supports 90+ languages, translates in real-time, saves transcripts, and runs entirely on-device. Apple Live Captions makes a good fallback for quick, casual use. And built-in conferencing captions are fine for the occasional meeting where you don't need a full transcript.
The good news: all three methods can coexist on the same Mac without conflicts. Try them and see which combination fits your workflow.
Download NotchLive free
Live captions and real-time translation in your MacBook's notch. On-device Whisper AI. 100% private. Free forever — Pro $14.99 one-time.